TRX UPPER AND LOWER CONNECTION
If you have the stock plastic upper deck there is a way to connect the bottom chasses to the upper deck through the steering posts. This makes the truck a lot more rigid and eliminates flex quite a bit!!! An aluminum upper deck will totally eliminate flex and make the chasses very rigid , but HEAVY! A Carbon Fiber upper deck will make things rigid enough to its awesome light-weight to strength ratio!
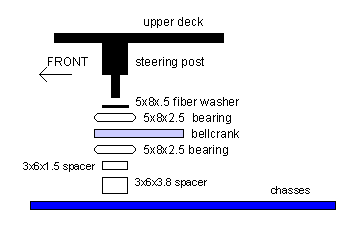
- You will need:
- (2) 5x8x.5 mm trx fiber washers part # 1985
- (4) 5x8x2.5 mm bearings part # 2728
(reference only, any brand bearing will do!)
- (2) 3x6x1.5 mm aluminum spacers part # 2539
- (2) 3x6x3.8 mm aluminum spacers part # 2539
- (2) 3x20 mm counter sink philips head screws
(counter sink alloy hex head, best choice) - and some patients !!!!!
It will take a little bit of time to do this being the little parts they are, The best thing is to unhook the steering linkage from the bellcranks and remove the entire FT
bulkhead. You may have to turn the truck upside down to start? here is a diagram:
Longer Rear Suspension for the Nitro Rustler!
Purchase a set of longer rear suspension arms trx part # 3655.
This will allow longer suspension travel and more stability! Plus higher speeds reducing some of the toe in, in the rear.
You will also need to purchase some longer tie rods 62 mm and some longer rod ends for at least one end, for increased strength of the tie rod connection.
- Move the tie rod link to the lower inside hole of the rear bulkhead.
- REVERSE the arms from L to R for access to shock mounting holes.
- also REVERSE the A-ARM Mounts L to R. Zero degree arm mounts will have hardly any toe in at all and will upset straight line driving. Using the stock + or - 1 degree arm mounts trx part# 2798 or SS RCR part# 2500 (which is highly is recommended).
Off Road Suspension Set Up!
In the FRONT:
- TRX XL Big Bore Aluminum shocks
- very soft springs, w/ 13mm pre load spacer combo
- shock mounting positions: (shock tower) top inside hole, (A-arm) inside hole
- 25/30 weight associated 100% silicone shock fluid
- a 3 hole piston
- no extension travel limiter used
In the REAR:
- TRX XXL Big Bore Aluminum shocks
- med. black stock springs, no pre load spacers
- shock mounting positions: (shock tower) top outside hole, (A-arm) second to furthest outside hole.
- 30 weight associated 100% silicone shock fluid
- a 2 hole piston
- 1.5 mm extension travel limiter used
Suspension Arms level in the rear and lower than level in the front!
Slipper Clutch Adjustment Never Fail!
To prevent the slipper clutch adjustment from changing, Double-nut the adjustment bolt!
You will need:
(1) 5x10MM steel washer
(2) plain steel 5MM thin hex nuts (do not use nylon locking nuts)
(1) thin open end 7MM wrench
(1) trx small hex wrench
Put a 5x10 mm steel washer after the the outside slipper ring, then the spring. Use (1) of the 5MM thin hex nuts and tighten all the way down (snug). Come back out about 3/4 to 1 turn (good overall starting adjustment). Depending on track conditions, adjust the slipper clutch accordingly, using the reference manual.
Once a final adjustment is made, finger tighten the second thin hex nut against the first nut. Use a thin open end 7MM wrench and hold the first nut in place while tightening the second nut against the first one using the trx hex wrench!
Make sure the brakes are being applied when tightening the second nut against the first one. This will keep the adjustment were it has been set!
You may have to custom thin down a small 7 mm open end wrench to do this
TIP: Running the slipper a tad loose will save on the drive train components when landing a jump!!
Check out our growing product line...See you at the Finish Line! |
SS
R/C Racing
Schenectady, NY.
Add us to your Favorites!
We add new products all the time! Click Here!
Customer Comments:
See what our customers have to say about SS RC Racing products!
|